Where Is the Rocker Panel on a Truck
(Rocker panel trim is the painted plastic body trim underneath the doors)

courtesy of Long Road Racing; click to enlarge
Quite a while ago, I recall reading how those that were auto-crossing and racing their Miatas and perhaps coming in contact with those pesky orange cones, were losing their rocker panel trim (commonly, but technically incorrect, called rocker panels) and how Mazda had responded by issuing a TSB (Global MX-5 Cup Car Technical Service Bulletin #3-22-17B), which not only answered these driver's concerns that the panels were just hanging on plastic clips, and therefore, weren't really "fastened" to the vehicles, but it also made fastening the panels a "legal" modification for racing qualification (I'm curious as to whether Fiat has issued a similar TSB).
I recall reading the TSB, and not having a very good idea as to where the three self-tapping screws were allowed, nor where the mounting surfaces were and what these clips looked like (I didn't try very hard, as I haven't looked underneath there since installing the plugs my dealer forgot to install). Then yesterday, someone posted a common forum question – "What are these plugs for, and what do I do with them?", and with one of the replies, a very clear photo showing the clips that hold the rocker panel trim, was posted. ⇓

photo courtesy of Casey Jones
Now it became clear, that dislodging the panels probably wouldn't take too much force. I've been told that driving through an unexpected large puddle at highway speed could be all it takes!
I brightened up another forum photo showing a screw in place, and it too reveals the clipping better ⇓
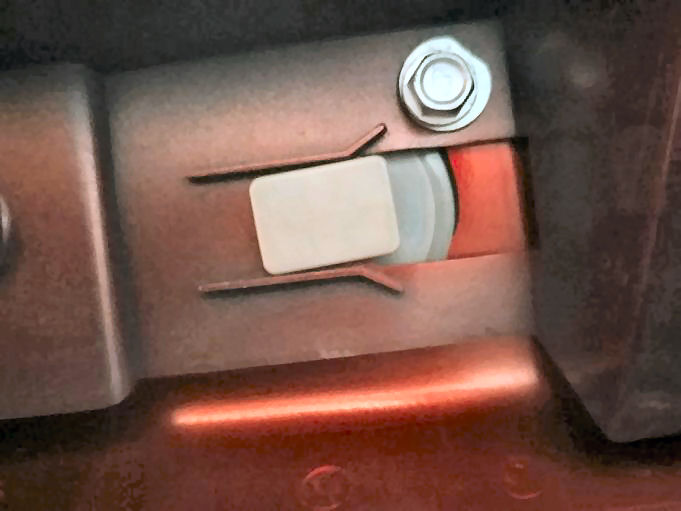
original photo courtesy of Good-win Racing; edited by ameridan
So even though I'm not an Auto-crosser, I think I've finally been inspired enough to locate some quality stainless steel self-tapping screws, to insure that some road debris won't dislodge one of my rocker panels, by pre-drilling and installing at least 3 of those screws per panel (if you aren't qualifying for racing, 5 might be better), along the inboard edge in the vicinity of those bottom clips, where I'm confident the actual rocker panel sheet metal is directly behind the trim. This will prevent the panel from "shifting" out of those clips, or falling off should some of them fail under stress, as magoffin's have.

photo courtesy of magoffin
It turns out that you needn't raise the car that much to drill the holes. Lifting the vehicle at the forward rail "pad" such that the suspended front wheel is about an inch off the ground, was plenty high enough for both drilling and driving the screws in.
About an hour after I published this article, Leon Russ posted this photo ⇓, along with his comment that road debris had just dislocated his rocker panel. This is exactly what I wish to avoid!

photo courtesy of Leon Russ
Looks like there are about 10 other green clips holding the trim panel on, in addition to the 5 white clips along the bottom edge.
If your rocker panel does become dislodged,Tim Oyer had this advice for reinstalling:
Take all the green clips out of the body of the car (just take something thin and fairly rigid and squeeze in one side of the squeeze-clip, then gently rotate and yank it out), and put them in place on the rocker panel. Once all in place, slide the bottom clips into place, then rock the rocker upward and push the green clips into the mounting holes. It can be done easier if you lift the car up a bit, but otherwise can be done in a parking lot, no problem. When you get home, add the screws!
Similarly, Good-win Racing describes the process:
It gets attached under the car first.
Start with taking those green plastic pop clips off the car and install them back on the rocker panel. Try to get them off the car without breaking them (i have popped them from the car with a serving fork though there is a tool made for the task). You then look at the low side of rocker panel, that low side needs to get attached under the car and SLIDE [the grey clips] into place before [aligning the] green clips along the top half of the rocker panel with their holes and snapped back in. Once bottom is properly slid into place…then top just pops on if you have those green bits aligned right (take your time to make sure ALL of them lined up nice before you pop upper half back on)..
Where Is the Rocker Panel on a Truck
Source: https://21stcenturyfiat124spider.wordpress.com/2019/05/30/securing-your-rocker-panels-proactively/
0 Response to "Where Is the Rocker Panel on a Truck"
Post a Comment